Imagine your Catapult website is like a library book. If the book is checked out, no one else can check it out. Making a subsite is like breaking off a chapter of the book so that it can be accessed separately.
There are two reasons to make a subsite:
1) If you want a user to have access to only one portion of the subsite. Many Districts choose to break off different departments, so that each department can manage their own information.
2) If you want multiple people to log in at the same time.
Instructional Video:
Creating a Subsite:
-
From your dashboard, click on MANAGE WEBSITES.
-
Find the OPTIONS button to the right of the site name and click on the arrow. Select the CREATE SUBSITE option.
-
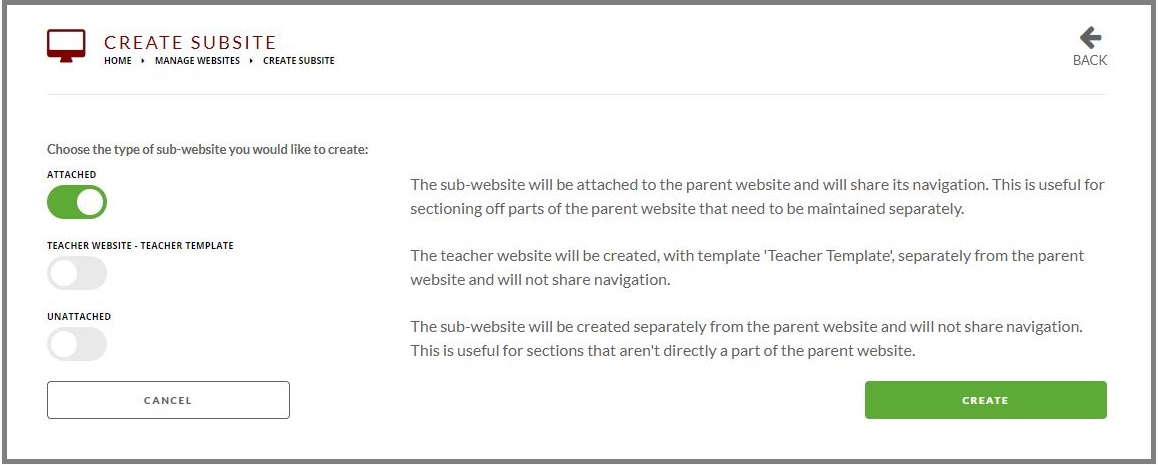
A new window will open with 2 or 3 options for the type of subsite you can create. If you have a teacher template, you will have the option to create a teacher website with that template. If not, you will be able to create only an attached or unattached subsite.
- After selecting the type of subsite you would like to create and pressing Save, you will be returned to the MANAGE WEBSITES page.
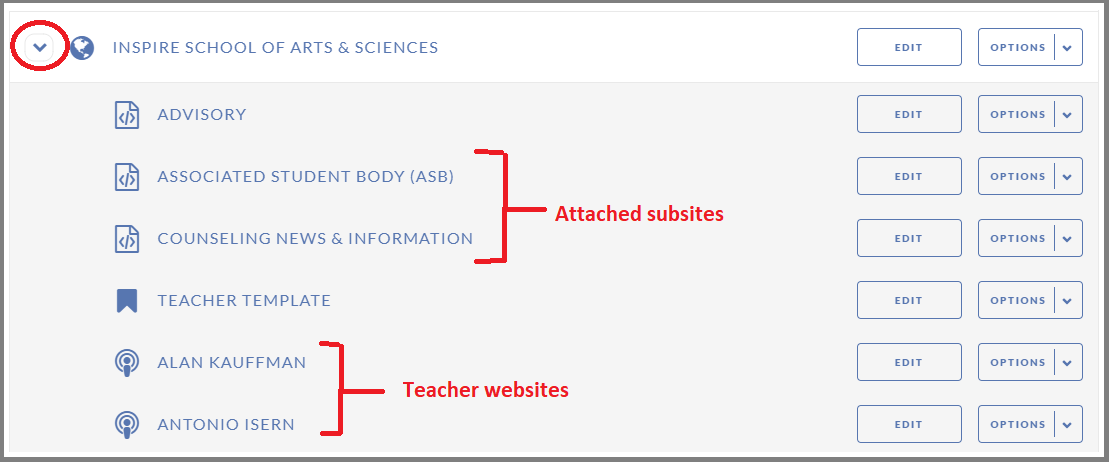
Note that there is now an arrow to the left of the website name. When you click this arrow, a list of subsites appears.
- Click the EDIT button to the right of the subsite you created, and you will be able to edit the subsite yourself. You will need to go to the the user panel to assign users to that subsite. For more information on user management go to our User Management Article.
Editing a Subsite:
- To begin editing the subsite, simply press EDIT to the right of the subsite name.
- Once inside, you will be able to edit the content, create and rearrange pages. The editing controls and processes are the same as working in the normal site, except that you can see and change only the pages and content in this subsite section.
- If you would like to access the rest of the site (and you have permission to do so), you must log out of the subsite, go back to the MANAGE WEBSITES page, and click EDIT opposite the full website name.
- In the full site, you will be able to see the page name of the subsite you created, with a special subsite symbol. You won't see any of the subsite's subpages, as you have to access the subsite separately.
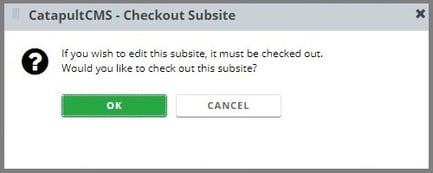
- To open the subsite when editing the main site, you can simply double click on the subsite or click EDIT. and you will see a window asking if you want to check out the subsite. Click OK and the subsite will open with all its subpages.
- Rearranging pages in the main site with many subsites can be tricky, so we recommend that you keep only subsites that are needed. If you would like to remove or unattach a subsite, just click the OPTIONS button to the right of the subsite and select UNATTACH SITE. Be aware that any users attached to that subsite will be lost unless you assign them to another section first.

Check out our User Management video for more on how to assign a user to a site.