Catapult offers an easy-to-use solution for editing your banner photos. Not only is there a professional tool for editing pictures, but we also help you crop your photos to the exact resolution your template requires. The banner cropping tool ensures that your photo will be the right size every time, and it will let you know if your photo is too small to display well on your website. Follow along with our tutorial video or check out the steps down below!
Instructional Video
How It Works
-
Open the Banner area: In your Catapult editor, click on the banner area. Once the element has opened, you will be able to view thumbnails for all images currently in use, if any.
-
Reorder photos: You can move your banner photos around by clicking on the grey bar on the thumbnail and dragging it to a different position, thereby reordering the banner images.
- Add a photo: See instructions below.
-
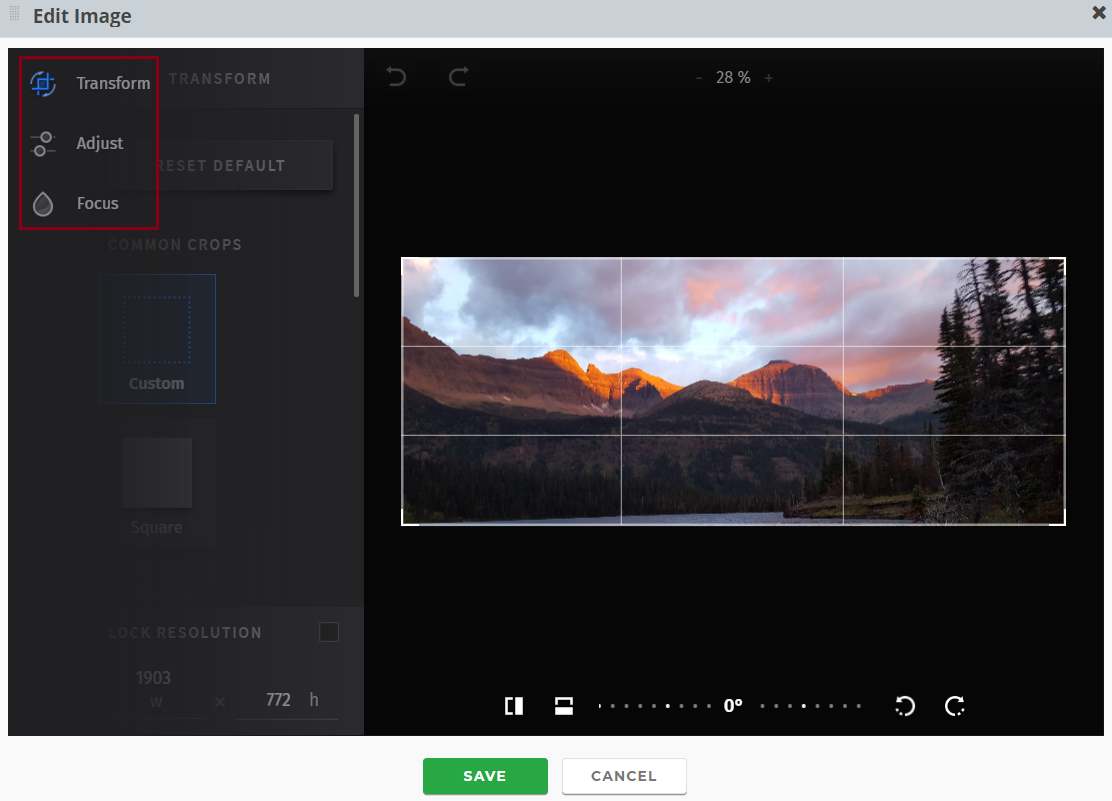
Edit a photo: To edit a banner image, click on the pencil icon at the top of the thumbnail.

The photo editor will open up and allow you to crop, adjust the light balance and color, or adjust the focus of the image. The focus tool can be helpful to make your photo look a little more professional, as well as blur out students' faces in the background if you don’t have their photo permission.
-
ADA compliance: The icon to the right of the pencil is for text and it will show up as one of two ways: a red wheelchair icon or a green speech bubble.


The red icon stands for an ADA error. To fix an ADA error, you must click the icon and fill out the text box labeled ALT TEXT. ADA text is required, so if you have our forced ADA compliance turned on (which you should), you will not be able to save your banner until you add some alternative text. Remember, ADA text is not a caption; it should be a true description of what you see happening in the image. It will not be visible on the website. For further discussion of ADA Compliance, see our ADA Compliance article.
-
Add title & caption: Within the popup window, there are also spaces to create a Title and Caption for your image that will show up on the site.
-
Make a link: The third icon is the Link icon.

Here, you can add or edit a link that can be visited right from the banner image. If you attach a link to the image, a READ MORE button will appear on the banner to take viewers to the linked content.
-
Delete: Finally, there is the DELETE icon which will remove a photo from your banner.

Uploading a Photo
There are two ways to upload a photo: add a photo from IMAGES or UPLOAD. If you have the banner cropping tool turned on, we suggest you use the Upload button to pull images straight from your computer. That way the tool can automatically crop the image to the proper size, as well as set the correct resolution. Photos uploaded in this manner will be saved into the Banners folder in Images. Adding banner images with or without the cropping tool is the same process.
Using the Banner Cropping Tool
-
After selecting the image from your computer, the tool will automatically pop up. It will show the photo resolution on the left and a preview panel on the right. Image resolutions will vary depending on the template and design of your site.
-
You will be able to move the cropping rectangle on the image in the preview panel to crop it to your liking.
-
If you need to adjust the image further, simply click on the pencil icon to go back to the editor.
Without the Tool
-
After selecting the image from your computer, the image will be uploaded to the banner element in whatever resolution it is currently set at. Once the image is uploaded, you can select the pencil icon to open the editor.
-
You will need to manually change the resolution and cropping on the image, which can be a bit of a guessing game.
If you don’t have the Banner Cropping Tool feature (but would like to), please let us know and we would be happy to add that functionality for you!
Happy Editing!