
WeTip User Management Guide
Follow this guide to learn how to review, add, and edit WeTip users in CatapultEMS.
Table of Contents
Manage Users
How to Get There
District Users
- Sign in to CatapultEMS.com using a District Team account.
- From the Account Dashboard, choose Manage District Users (top right side of page).
Site Users
- Sign in to CatapultEMS.com using a Site or District Team account.
- If you are on the Site Team, skip to the next step. If you are on the District Team, go to a specific site first. From the Account Dashboard, choose View All Sites > site name.
- From the Site Dashboard, choose Manage Site Users (top right side of page).
How to Search by Names
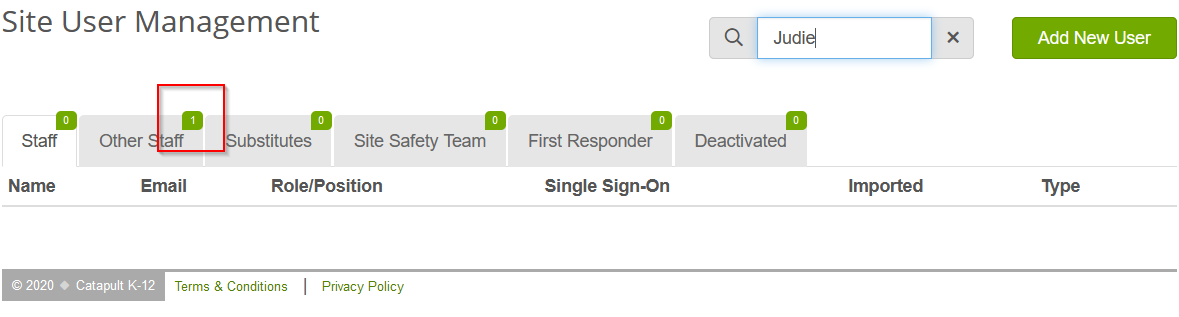
You can search users by name. As you type, names filter away and each tab displays a count of matching users (see red outline on figure below). Remember to check all tabs, since the person you want might be in another tab.
How to Search by Emails
You can search users by email address. Unlike names, email searches check across all sites in the account and let you edit that user or add them to your site (depending on your access level). This can help manage users who work at multiple sites.
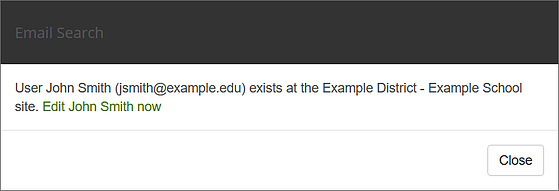
Since the pop-up can interrupt your typing, you may prefer to copy and paste the email address from elsewhere rather than type directly into the search box.
How to View Users
On the user management page, CatapultEMS/WeTip groups users into several tabs by access level. For a description of these access levels, see User Access.
Table Headings
-
Name: Last name followed by first name.
Email: The primary email used to receive messages and also used to sign in.
Role/Position: For example, “Teacher”, “Principal”, etc.
Email Conf.: Date user signed in to CatapultEMS to confirm their email address.
Text Conf.: Date user signed in to CatapultEMS to confirm their phone number for text messages.
- To confirm your phone number, visit: https://www.catapultems.com/Account/ConfirmContact
- To send an email requesting confirmation, see Send confirmation emails to multiple staff or send confirmation email to a single user.
- Single Sign-On: Whether the sign-in integrates with the user’s main work email address and password. For details, see Password on the new user page.
-
Imported: Whether the user was imported from the organization's HR/student information system (versus a user that was added manually). In most cases, this will be manual.
Actions
- Edit: Change user settings. For a description of all user settings, see Add New Users.
- Deactivate: Deactivate any users who no longer work at your site. That way, they don’t receive notifications.
- Activate: Deactivated tabs only. If a deactivated user or substitute starts working at your site again, choose Activate to bring them back.
Add/Edit Users
How to Add/Edit District Users
- Sign in to CatapultEMS.com using a District Team account.
- From the Account Dashboard, choose Manage District Users (top right side of page).
- Choose Add New User (green, top right) or choose Edit next to an existing user.
- Fill in the user details (see User Details below for instructions).
- Choose Save or Save & Send Confirmation.
How to Add/Edit Site Users
- Sign in to CatapultEMS.com using a Site or District Team account.
- If you are on the Site Team, skip to the next step. If you are on the District Team, go to a specific site first. From the Account Dashboard, choose View All Sites > site name.
- From the Site Dashboard, choose Manage Site Users (top right side of page).
- Choose Add New User (green, top right) or choose Edit next to an existing user.
- Fill in the user details (see User Details below for instructions).
- Choose Save or Save & Send Confirmation.
User Details
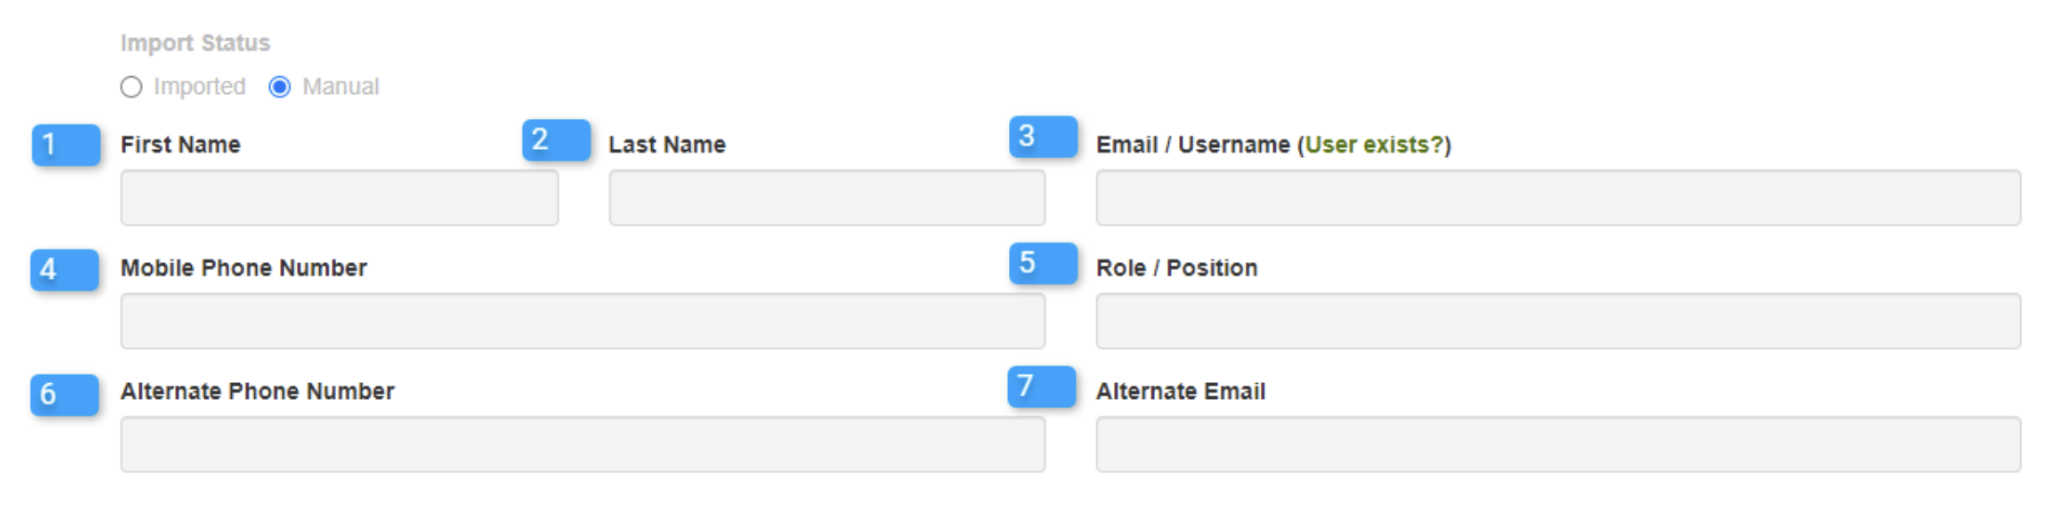
- First Name (required)
- Last Name (required)
- Email / Username (required)
- Choose User exists? to check whether an email address is already in the system. If you have one person working at multiple sites, it should let you add the existing user to your site if you choose User exists? > Add (name of person). If you have one person working at multiple districts, contact support@wetip.com to update their account.
- Mobile Phone Number
- Add a number if it is a work device or you have their permission. If you leave the number blank, staff have an opportunity to enter their personal details when they sign in.
- Role / Position
- For example: “Teacher”, “Principal”, etc.
- Alternate Phone Number
- This can be an office/classroom phone.
-
Alternate Email
Password Settings

Single Sign-On (Google, Microsoft, or Entra)
Most organizations use Single Sign-on with CatapultEMS/WeTip. If you use the Continue with Google/Microsoft buttons to sign in to CatapultEMS/WeTip, your organization is using Single Sign-on. In this case, you can:
-
Choose Use Single Sign-on (Google/Microsoft Entra).
Leave the password field blank.
Manual Passwords
A few organizations (often with small IT departments) manage passwords separately in CatapultEMS/WeTip. If your password to sign in is different from your main work password, then your organization is managing passwords separately. In this case, you can:
- Uncheck Use Single Sign-on (Google/Microsoft Entra).
- Choose Generate Random Password or manually type in an initial password.
- Choose Require password change on next log in.
- Be sure to choose Save & Send Confirmation at the end, so the user receives their initial password.
-
Password Resets
Depending on a user’s setup, their password might be controlled by CatapultEMS/WeTip or
controlled by your IT team.
- If the Single Sign-On column says “Yes,” their password is synced with their work email. Talk to your IT team to reset the password.
- If the Single Sign-On column says “No,” reset the password in CatapultEMS.
- User Access
District options:
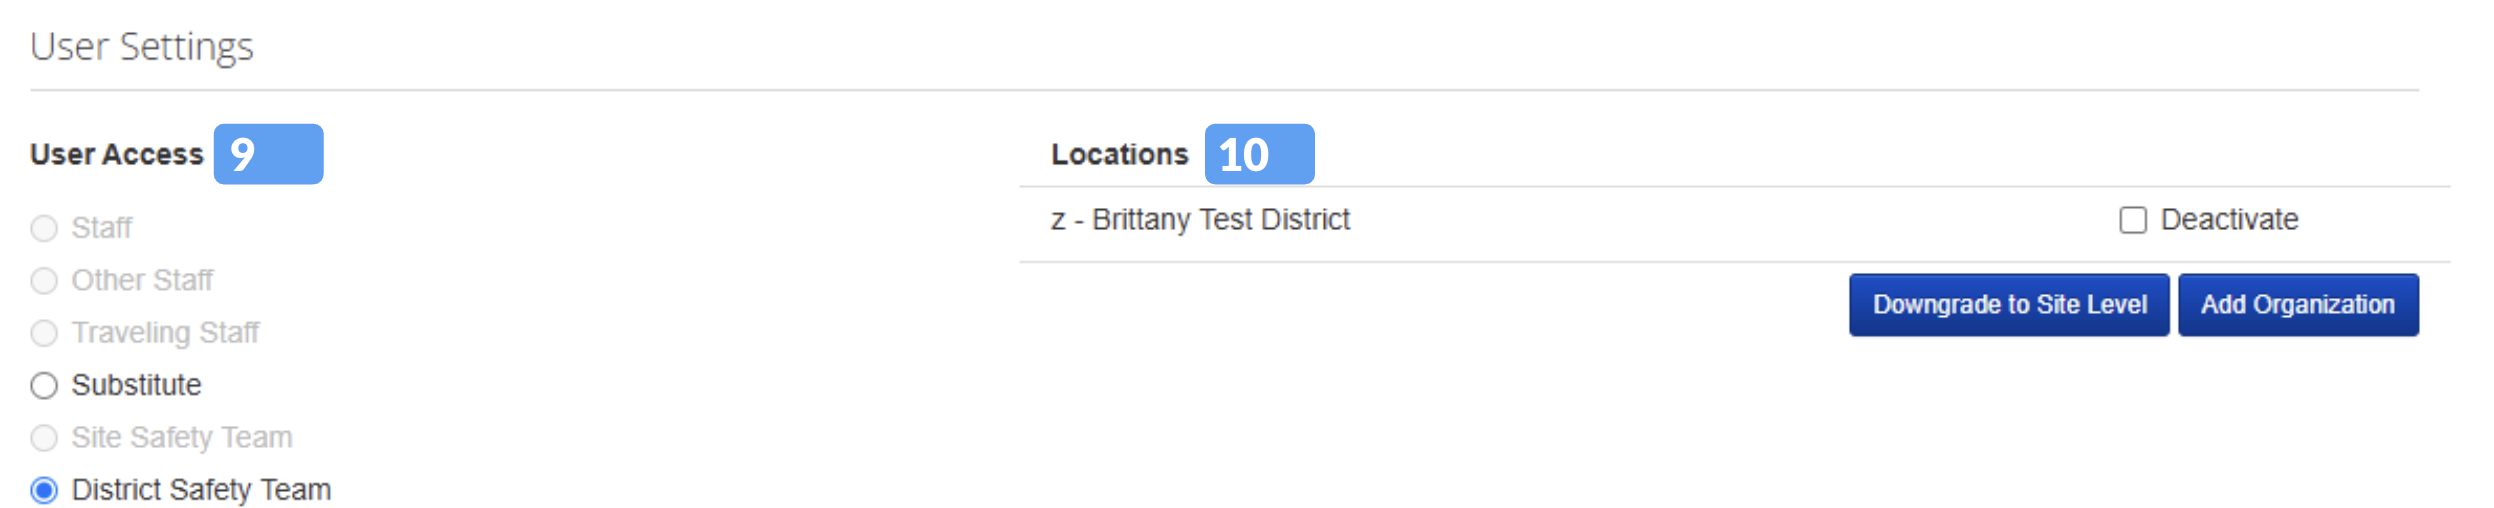
Site options:

Below is a summary of user roles.
- Site Safety Team: Can process any incident reports for the site. The Site Safety Team can also manage site users.
- District Safety Team: Has full access to the account. The District Safety Team can manage all users and account settings.
- Locations
Only District Safety Team accounts see all the sites a user is assigned to, since they work with multiple sites.
Choose Add Site to assign a user to a site. For staff who work at multiple sites (such as itinerant teachers) you can assign multiple sites. For district-level staff who need access to the entire account, choose Upgrade to District Safety Team (at the bottom).
Choose Deactivate EMS if a person has left a particular site. This will deactivate their access (including notifications) to CatapultEMS/WeTip for that site.
- Communication Preferences

You can receive communications by email or text.
- Incident, Caution Alert, and Action Alert: CatapultEMS customers only. For more information, see Manage EMS Users.
- Anonymous report alerts: Users on the Report Response Team will have additional alerts to choose from such as Bullying, Concern for Self or Others, etc.
- If your organization only subscribes to WeTip, all Safety Teams should be part of the Report Response Teams.
To receive notifications in the CatapultEMS mobile app, you must have at least one method selected (email, text, or voice).
Site/District Confirmation Email
If you choose Save & Send Confirmation (bottom of page), the system lets you customize the confirmation email.
The message can include special words surrounded by triple dollar signs (“$$$”). For example, $$$FIRSTNAME$$$ becomes “John” in a confirmation sent to a user with the first name of John. The special words are:
- $$$FIRSTNAME$$$
- $$$LASTNAME$$$
- $$$EMAIL$$$
-
$$$PASSWORD$$$ (Only works if you just manually set the password in CatapultEMS. See the Password section above.)
Choose Send to deliver the confirmation. Below your message, the confirmation email includes a large green button linking to: https://www.catapultems.com/Account/ConfirmContact
To send confirmation emails in batches, see: Send confirmation emails to multiple staff