
CatapultEMS PowerSchool Plugin Setup Instructions
Content
- Download & Install Plugin
- Staff to Student Export
- Staff Export
- Student Export
- School Export
- Attendance Export
- SFTP Setup
- Edit Remote Connection Screen
- Scheduled System Templates
- Manually Update Data in CatapultEMS
Download & Install Plugin
- Download Catapult Plugin v3.0 (leave in zip format).
- Log into PowerSchool - Admin (District Office).
-
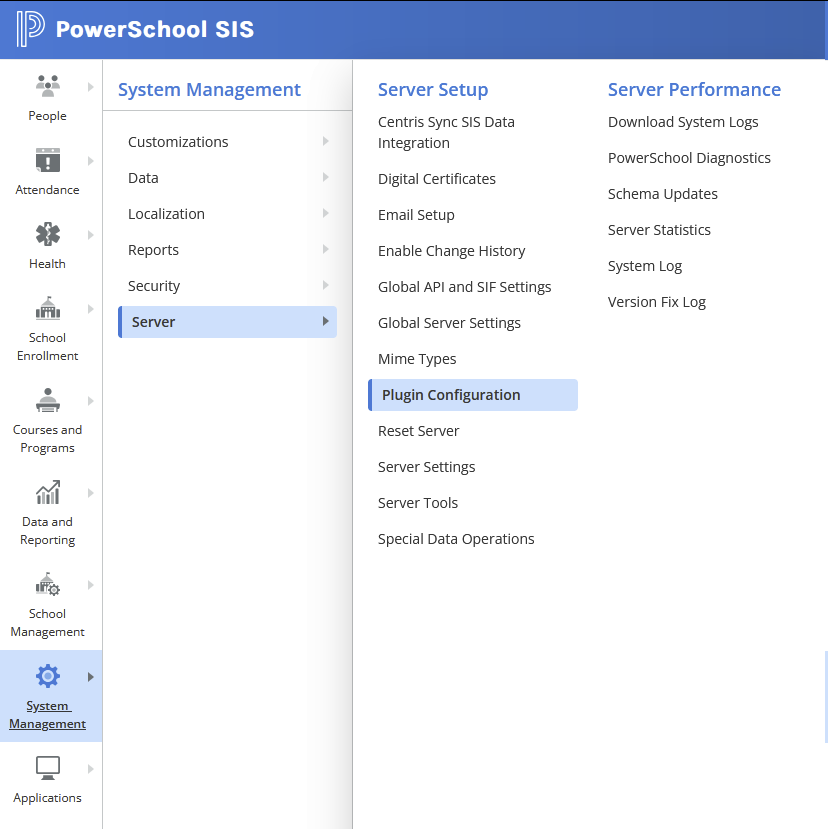
In the left pane, choose System Management > Server > Plugin Configuration (Old UI: System > System Settings > Plugin Management Configuration).
-
Choose Install (upper right).

- Choose Browse then choose the downloaded plugin location.
-
Choose Install.

-
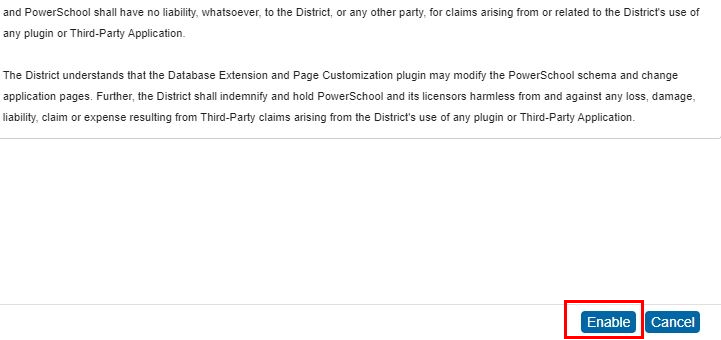
Once the plugin installs, it shows up in the list of plugins. Select the enable checkbox.
- In the right pane popup, choose Enable.
-


Staff to Student Export
- Confirm you are in the District Office.
-
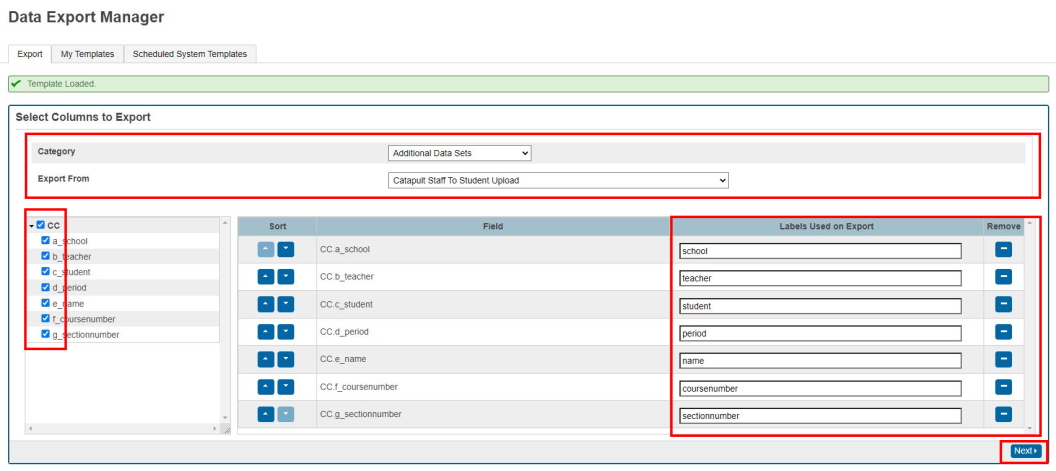
From the left pane, choose Data and Reporting > Exports > Data Export Manager (Old UI: Importing & Exporting > Data Export Manager).

- Change "Category" to Additional Data Sets.
- Change "Export From" to Catapult Staff To Student Upload.
- Choose the CC checkbox (which selects all the items below cc)
- For each label, delete the underscore and everything before it. (The a, b, c letters are only used to force sorting)

- Change CC.a_school to school
- Change CC.b_teacher to teacher
- Change CC.c_student to student
- Change CC.d_period to period
- Change CC.e_name to name
- Change CC.f_course_number to coursenumber
- Change CC.g_sectionnumber to sectionnumber
-
Choose Next.
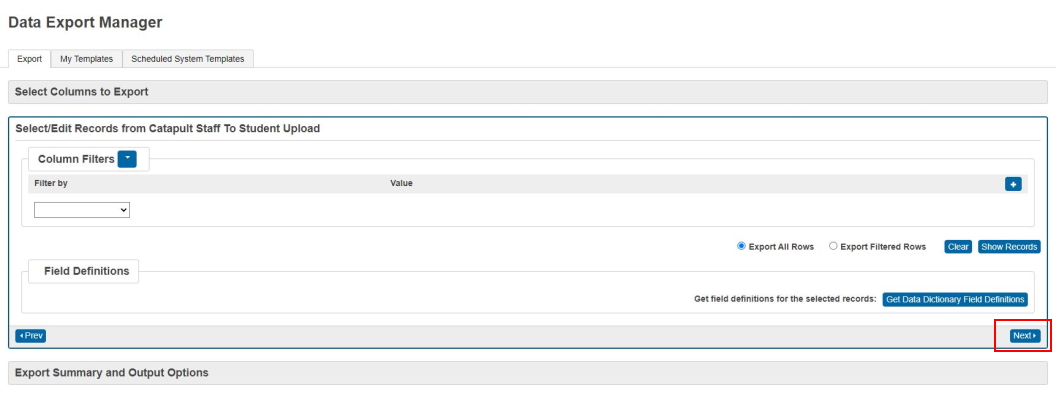
- Optionally, apply filters.
-
Choose Next.
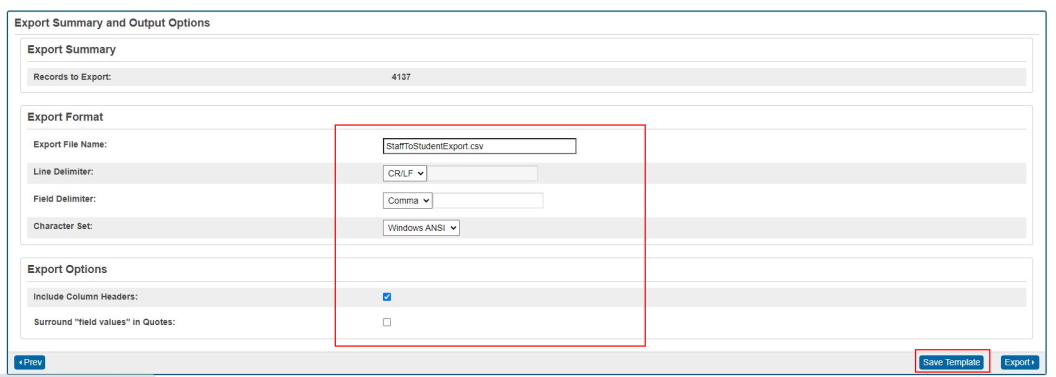
- Export File Name: StaffToStudentExport.csv *** Match file name exactly. No underscores. File extension must match. ***
- Line Delimiter: CR/LF
- Field Delimiter: Comma
- Character Set: UTF-8
- Select Include Column Headers.
-
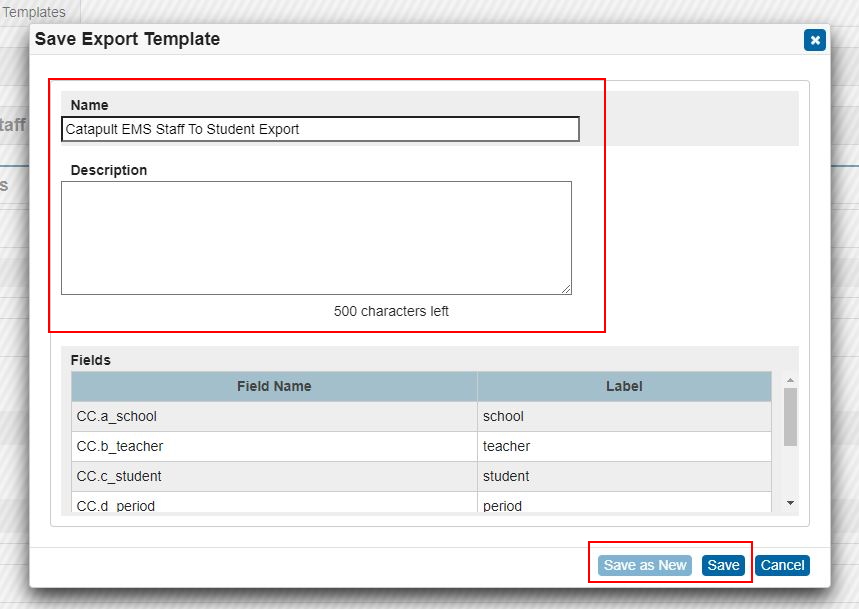
Select Save Template.
- For Name, enter CatapultEMS StaffToStudentExport. Optionally, add a description.
-
Select Save as New (or Save if the template has already been saved before).
Staff Export
- Confirm you are in the District Office.
-
From the left pane, choose Data and Reporting > Exports > Data Export Manager (Old UI: Importing & Exporting > Data Export Manager).
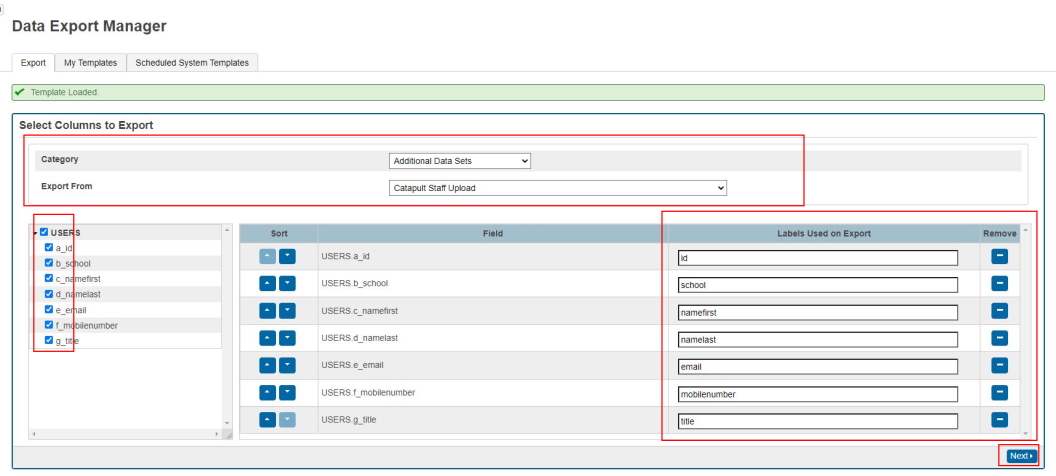
- Change "Category" to Additional Data Sets.
- Change "Export From" to Catapult Staff Upload.
- Choose the Users checkbox (which selects all the items below users).
- For each label, delete the underscore and everything before it. (The a, b, c letters are only used to force sorting)
- Change USERS.a_id to id
- Change USERS.b_school to school
- Change USERS.c_namefirst to namefirst
- Change USERS.d_namelast to namelast
- Change USERS.e_email to email
- Change USERS.f_mobilenumber to mobilenumber
- Change USERS.g_title to title
-
Choose Next.
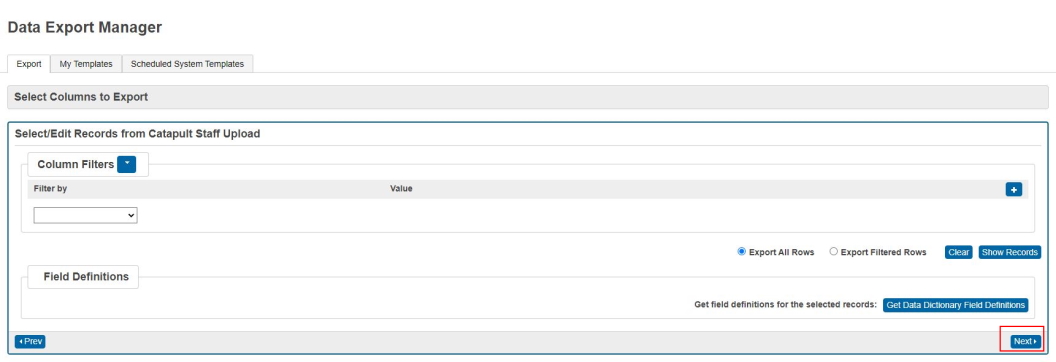
- Optionally, apply filters.
-
Choose Next.
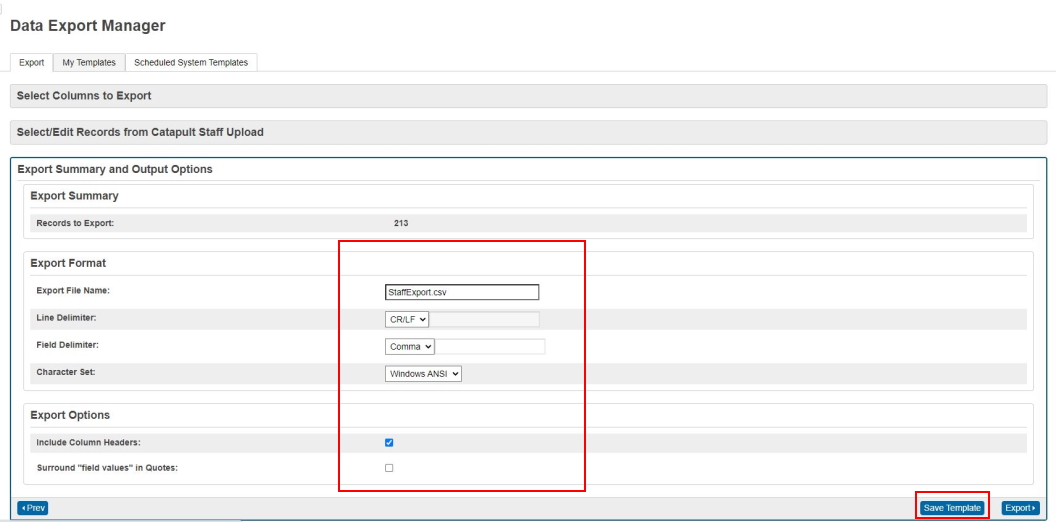
- Export File Name: StaffExport.csv *** Match file name exactly. ***
- Line Delimiter: CR/LF
- Field Delimiter: Comma
- Character Set: UTF-8
- Select Include Column Headers
-
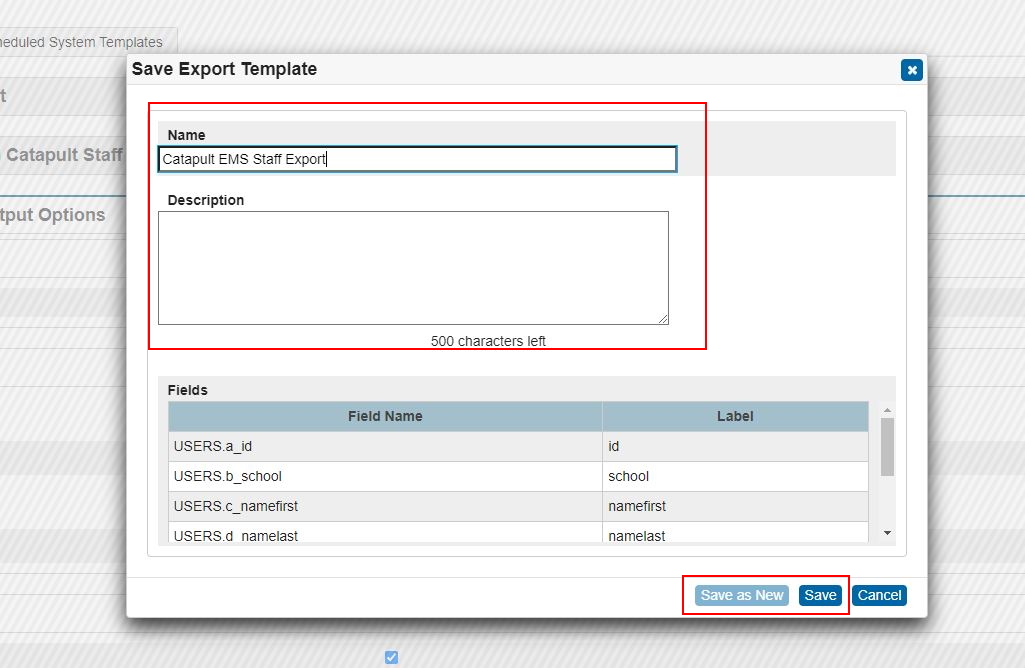
Select Save Template.
- For Name enter CatapultEMS StaffExport. Optionally, add a description.
- Select Save as New (or Save if the template has already been saved before).
Student Export
- Confirm you are in the District Office.
-
From the left pane, choose Data and Reporting > Exports > Data Export Manager (Old UI: Importing & Exporting > Data Export Manager).
- Change "Category" to Additional Data Sets.
-
Change "Export From" to Catapult Student Upload.

-
Select the Students checkbox (which selects all the items below users).

- For each label, delete the underscore and everything before it. (The a, b, c letters are only used to force sorting)


- Change Students.a_id to id
- Change Students.b_school to school
- Change Students.c_namefirst to namefirst
- Change Students.d_namelast to namelast
- Change Students.e_mobilenumber to mobilenumber
- Change Students.f_email to email
- Change Students.g_contactnameprimary to contactnameprimary

- Scroll down to show additional data. For CatapultEMS, you can omit the columns labeled ("used by CatapultCONNECT only")
- Change Students.h_contactphoneprimary to contactphoneprimary
- Change Students.i_contactemailprimary to contactemailprimary
- Change Students.j_zipcode to zipcode (used by CatapultCONNECT only)
- Change Students.k_busroute to busroute (used by CatapultCONNECT only)
- Change Students.l_grade to grade
- Change Students.m_lunchbalance to lunchbalance (used by CatapultCONNECT only)
- Change Students.n_primarylanguage to primarylanguage (used by CatapultCONNECT only)
- Change Students.o_primaryZip to primaryZip (used by CatapultCONNECT only)

- Scroll down to show additional data. Use these columns to filter your contacts/guardians. CatapultEMS does not use these columns directly.
- Change Students.z_ContactPriorityOrder to ContactPriorityOrder
- Change Students.z_IsCustodial to IsCustodial
- Change Students.z_IsEmergency to IsEmergency
- Change Students.z_IsEmergency to ReceivesMailFlg

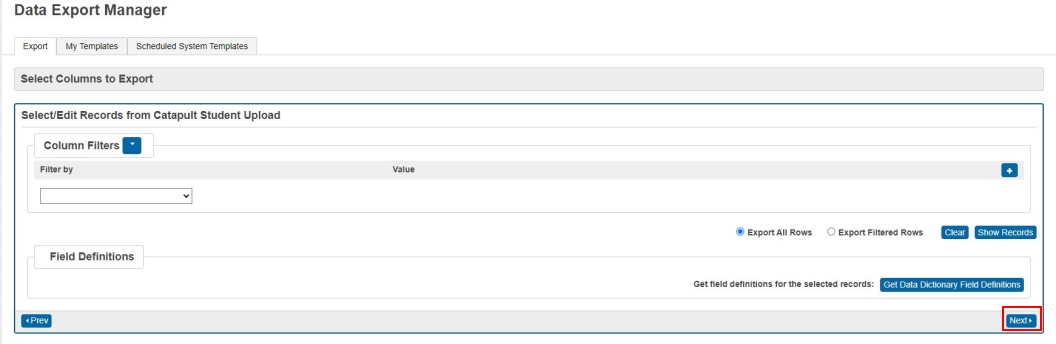
- Choose Next.
- Optionally, apply filters. For example, you can filter contacts/guardians based on IsCustodial, IsEmergency, etc.
-
Choose Next.
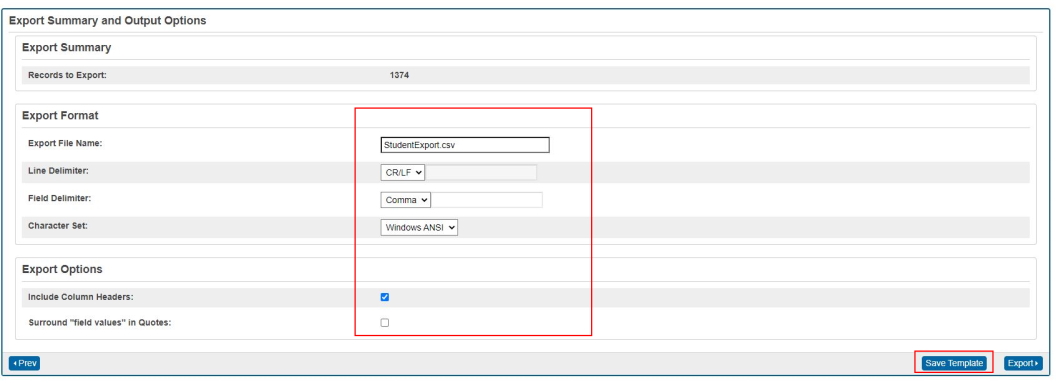
- Export File Name: StudentExport.csv *** Match file name exactly. ***
- Line Delimiter: CR/LF
- Field Delimiter: Comma
- Character Set: UTF-8
- Select Include Column Headers
-
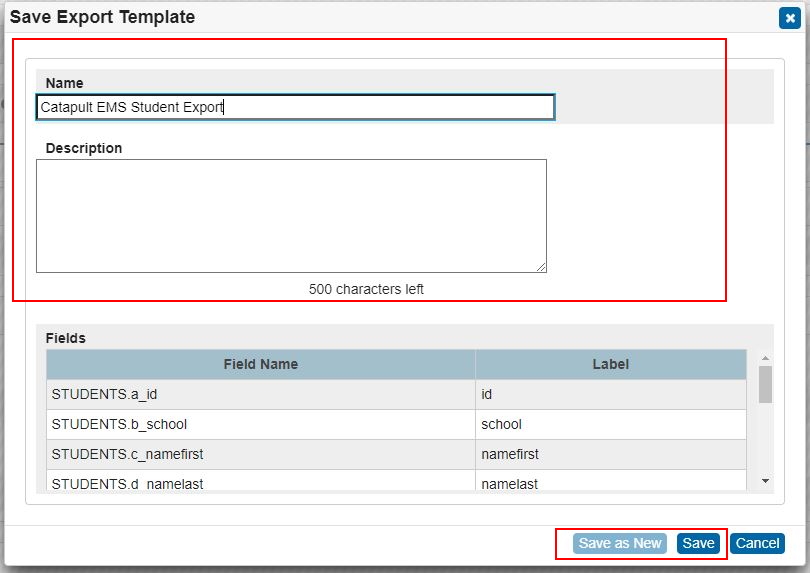
Select Save Template.
- For "Name," enter CatapultEMS StudentExport.csv. Optionally add a description.
-
Choose Save as New (or Save if the template has already been saved before).
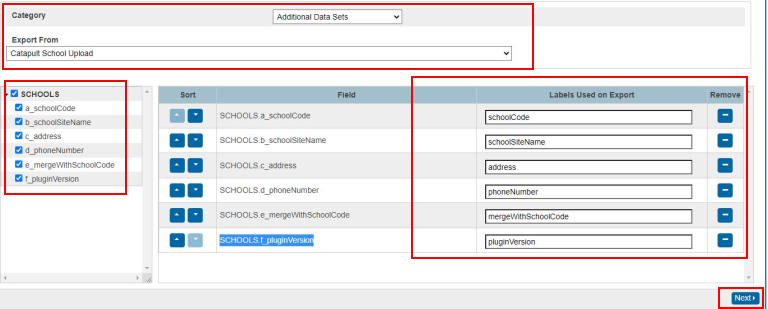
School Export
- From the left pane, choose Data and Reporting > Exports > Data Export Manager (Old UI: Importing & Exporting > Data Export Manager).
- Change "Category" to Additional Data Sets.
- Change "Export From" to Catapult School Upload.
- Select the Schools checkbox (which selects all the items below users)
- For each label, delete the underscore and everything before it. (The a, b, c letters are only used to force sorting)
- Change Schools.a_schoolCode to schoolCode
- Change Schools.b_schoolSiteNamel to schoolSiteName
- Change Schools.c_address to address
- Change Schools.d_phoneNumber to phoneNumber
- Change Schools.e_mergeWithSchoolCode to mergeWithSchoolCode
- Change Schools.f_pluginVersion to pluginVersion
-
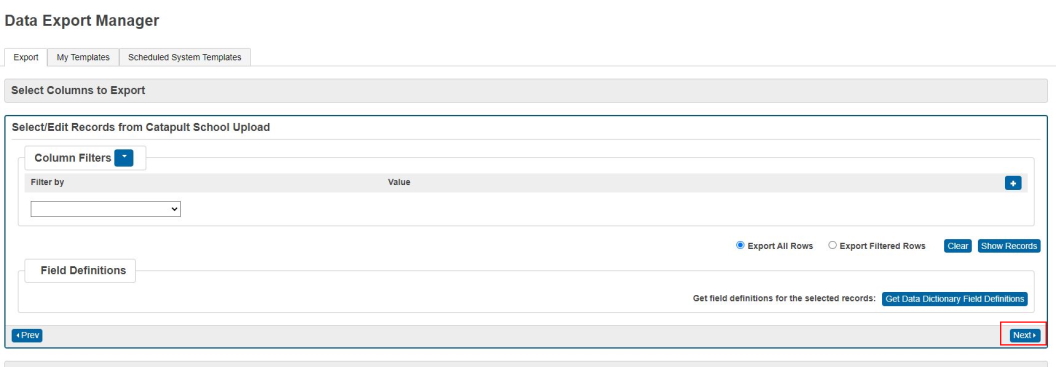
Select Next
- Optionally, apply filters.
-
Select Next.
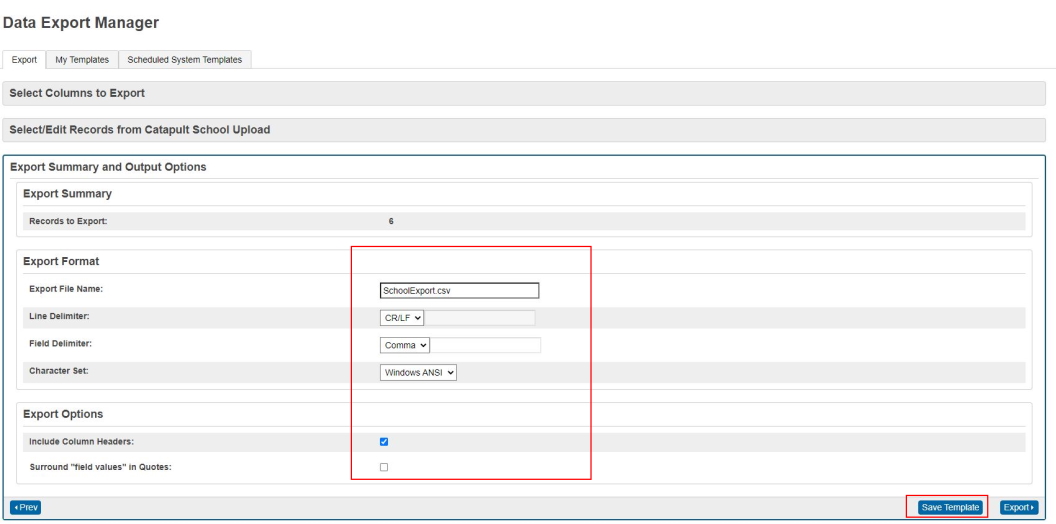
- Export File Name: SchoolExport.csv
- Line Delimiter: CR/LF
- Field Delimiter: Comma
- Select Include Column Headers.
-
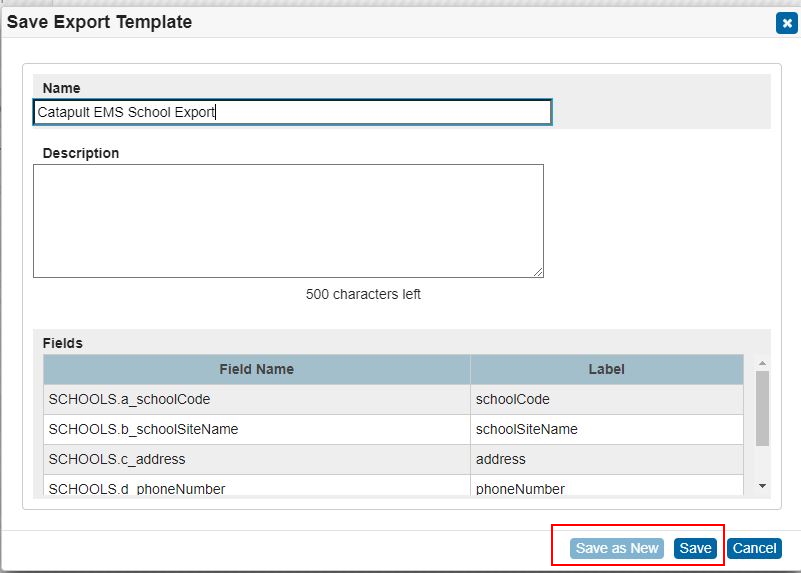
Select Save Template.
- For "Name," enter CatapultEMS Schools. Optionally, add a description.
- Select Save as New (or Save if the template has already been saved before).
Attendance Export
(Only needed for CatapultCONNECT customers.)
- From the left pane, choose Data and Reporting > Exports > Data Export Manager (Old UI: Importing & Exporting > Data Export Manager).
- Change "Category" to Additional Data Sets.
- Change "Export From" to Catapult Attendance Upload.
- Select the Students checkbox (which selects all the items below users)
- Change Labels for Export: students.a_ (etc) only used to force sorting
- Change Students.a_school to school
- Change Students.b_student to student
- Change Students.c_period to period
- Change Students.d_absenceCode to absenceCode
- Change Students.e_teacherName to teacherName
- Change Students.f_date to date
-
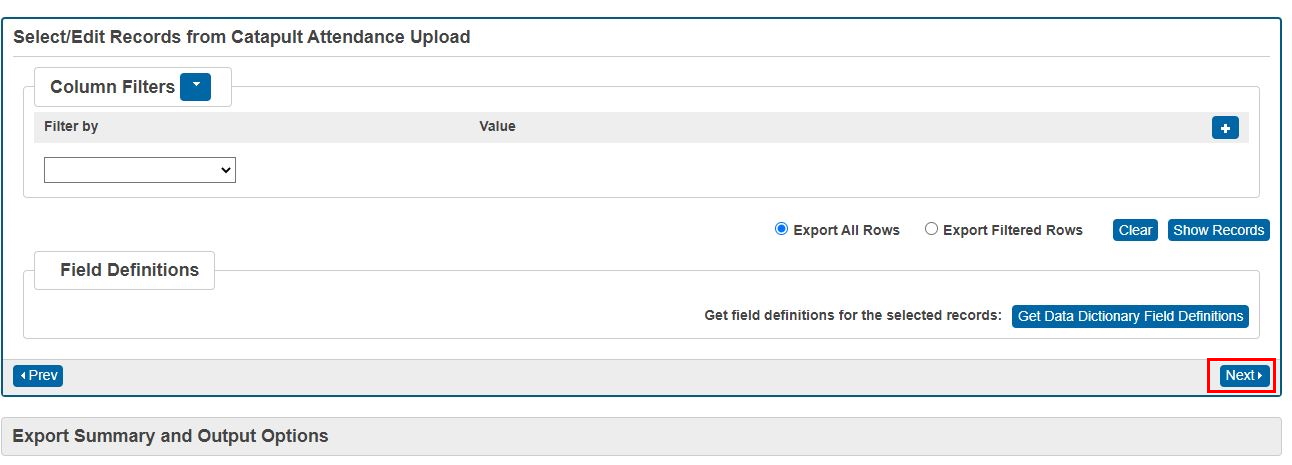
Select Next.
- Optionally, apply filters.
-
Select Next.
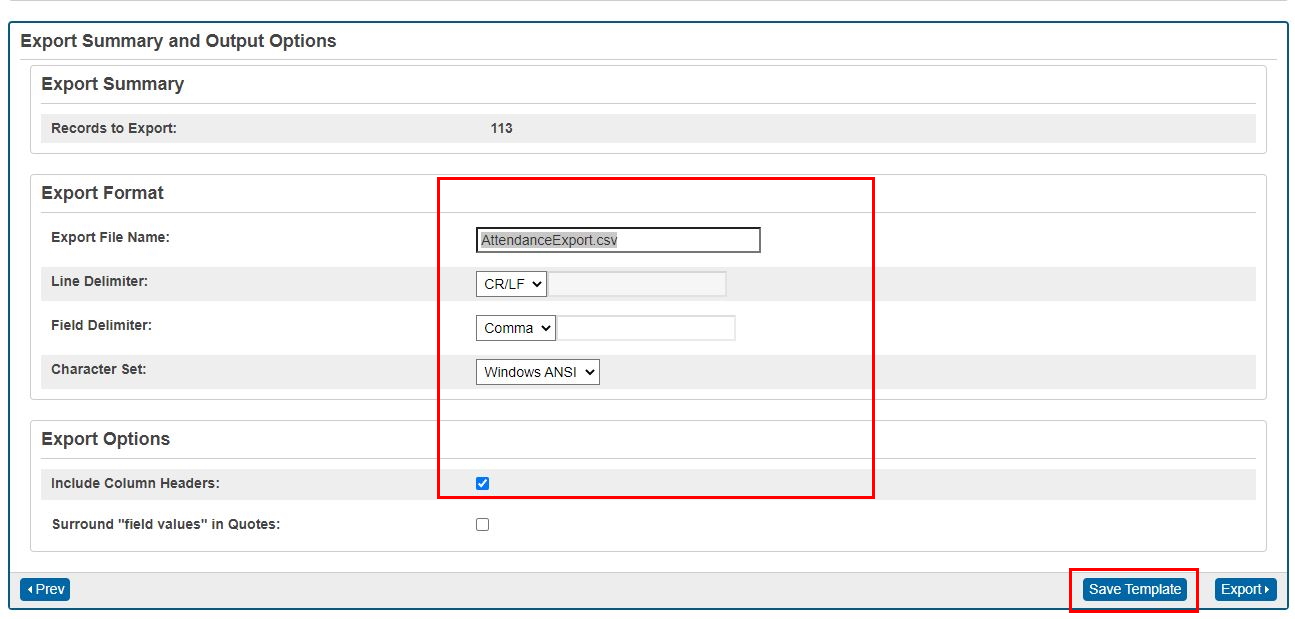
- Export File Name: AttendanceExport.csv *** Match file name exactly. ***
- Line Delimiter: CR/LF
- Field Delimiter: Comma
- Select Include Column Headers.
-
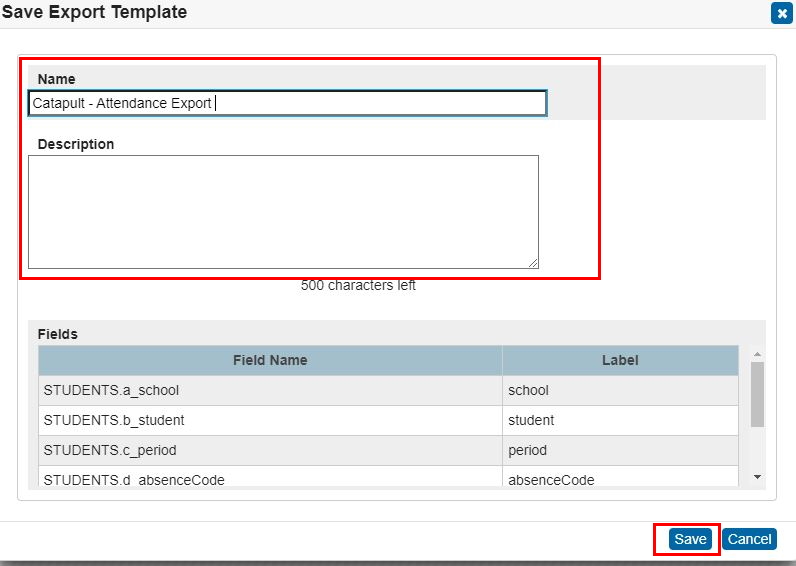
Select Save Template.
- For Name," enter CatapultEMS AttendanceExport. Optionally, add a description.
-
Select Save as New (or Save if the template has already been saved before).

SFTP Setup
- In the left pane, choose System Management > Server > Plugin Configuration (Old UI: System > System Settings > Plugin Management Configuration).
-
Select Remote Connection Manager.
-
Select Remote Connection Manager link (bottom of the page).
-
Select Create Connection.


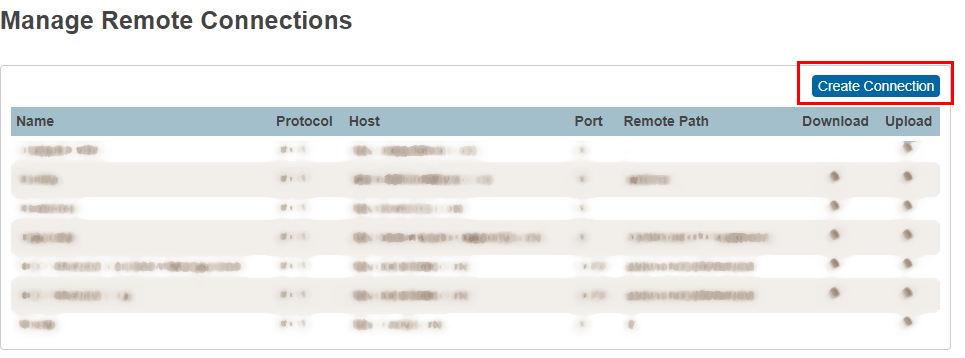
Edit Remote Connection Screen
- Name: CatapultEMS
- Protocol: SFTP
- Host: sftp.catapultems.com
- Port: 22
- Authentication Type: Password
- Enter username (provided by Catapult)
- Enter password in both fields (provided by Catapult)
- Choose Test Connection
- FingerPrint: The first time you connect, it says "Connection failed" because "The server host key does not match with any known hosts in the system." Select Yes, Accept Host Key.
- Remote Path: / (unless Catapult specifies otherwise)
- Check Allow upload
- Select Submit
Scheduled System Templates
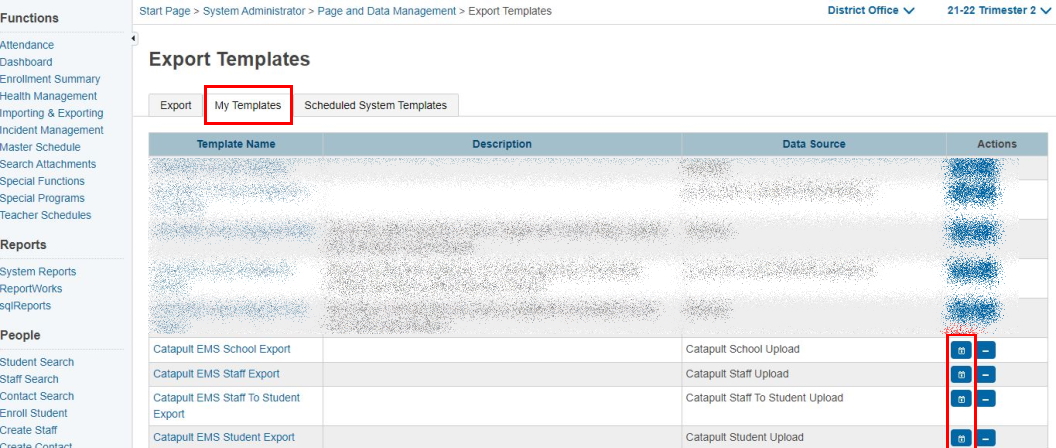
- From the left pane, choose Data and Reporting > Exports > Data Export Manager (Old UI: Importing & Exporting > Data Export Manager).
- Select the My Templates tab
- Select the calendar icon to the right of each of your newly saved templates
If you don’t see the calendar then you need to upgrade your permissions: System Management > Security > Under "User," choose User Roles > User Access > (desired role) > Export/Edit (tab) > User can set up and run scheduled system templates).
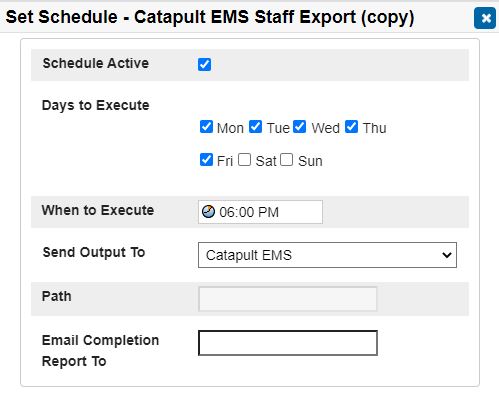
- On the Schedule pop tab
- Check Schedule Active
- Days to Execute: select desired days (For example, Mon-Fri)
- When to Execute: Enter desired time (Catapult recommends after school but before 11:00 pm PST. Rather than setting the same time for all exports, PowerSchool recommends 10-minute intervals between each scheduled export.)
- Send Output To: CatapultEMS (SFTP name entered in the sftp step above)
- Path: [leave blank]
- Email Completion: optionally, enter your email.
- Setup a schedule for each of the following Catapult templates.
- Staff
- Staff To Students
- Students
- Schools
- For CONNECT customers, setup schedule for Attendance Export.
Manually update data in CatapultEMS
CatapultEMS automatically imports data each night. As long as you have automated uploads each evening, the data in CatapultEMS should never be more than a day old. However, if you are testing or have significant changes that you would like to see right away rather than waiting over night, here's how.
- Log into PowerSchool
- In the left pane, choose Data and Reporting > Exports > Data Export Manager.
- Choose the Scheduled System Templates tab.
- Choose the triangular "Play" buttons next to each of the CatapultEMS uploads. Do all four of them.
- Log into CatapultEMS as District Safety Team
- From the Account Command Center, choose Settings > Imports (Users & Students).
- Choose Import Data Now.